Load Testing with K6
On a recent project I’ve been experimenting with using K6 for load testing. In this post I’ll discuss how to get started with K6 and some of the benefits of running load testing in using this tool.
What is Load Testing?
In a broad sense, load testing is sending requests to a website or service to test functionality. The requests can range from simple requests, such as “does it work or not?” to more complicated requests, such as “how much traffic can it handle before it fails?” Load testing allows you to interact with the page and verify that it is functioning properly.
What is K6?
K6, an evolution of loadimpact, an online load testing tool. It uses JavaScript to describe the testing that will be performed.
Starting Out
A VU (virtual user) in load testing represents a single actor making a request to the site. Let’s look at an example of a single request:

As you can see above, this is an example of a simple get request against. When we run it, the results in K6 are displayed as follows:

K6 returns stats about the load test, including how many requests were sent and how long it took to perform the requests. In this example, we had one VU that took 0.6 seconds to complete.
Obviously, a request with a single VU shouldn’t overload the site (at least, we hope so). Therefore, it’s important to be able to test the site’s load when it receives multiple requests. We can test this by running parallel requests that use “scenarios” to describe both the number of VUs and how they make the requests.
In K6, the parallel request looks like the single request, except that the number of VUs and iterations are specified:


As you can see in this example, the load test was run with 10 VUs, each with three iterations. This created a total of 30 requests that took 3.2 total seconds to run.
K6 also allows you to vary the number of views over time. Like the previous example, we are once again running a simple load test. However, this time, we also specify the duration for different VUs:


This allows you to mimic the heavy and light traffic times that you expect for your site.
Putting it into Practice
While the basics are important to understand, the tests we’ve discussed thus far don’t tell us much; they don’t tell us if the site is actually working.
To put the basic skills into practice and validate the data, we use simple checks, including:
- Status Code: Checking the status code of a request is the easiest way to verify that the load tests are working.
- Cookies: K6 allows you to monitor which cookies are being utilized and when they are being set, which can be a good indication of the success of the load test.
- Request duration: If the request duration is within the limits of what you would expect for the size and complexity of the test, it is likely that the load test is running successfully.
We can see these three checks in the following example:

As you can see, we are once again running a simple get against a site, only now we have included our three checks. In this example, we are confirming that the status code is 200, a specific cookie is being set correctly, and that the total request duration is under 400 milliseconds.
The results that are returned look similar to the previous test example, except now the three checks are also displayed:

As you can see, the first two checks were successfully passed in all thirty cases, but the request duration check failed in all but two of the cases.
This type of testing is sufficient for simple data, but there are more complicated behaviors that we also need to validate. This can be accomplished using several additional tests.
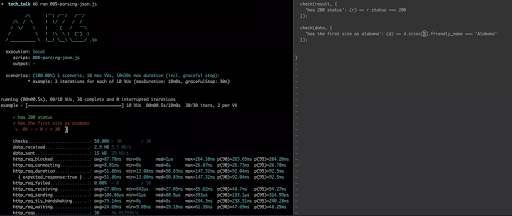
The first test is parsing the JSON:

In this example above, we are preserving the 200 check from the previous example, while parsing the JSON below. To complete this test, we can check for a given expectation based on what we know about the site’s data. In the example above, we are confirming that the userId of the first post is 1.
When the load test is run, we are given the following results:

As you can see, K6 has validated that the data is valid. However, if we change the expectation to something we know is incorrect, K6’s validation will instead return a failure:

The second test is to scrape the page for other links. When combined with parsing JSON, scraping the page is an extremely efficient validation tool. For example, we can grab links to other pages in the order in which they appear:


Rather than just seeing if a site works, this allows us to interact with and validate the content of the page.
The third test is logging in, or more generally posting a form. In this example, we have the user payload, and are then checking to see if we are able to sign in successfully:


Now that we’ve verified that we can log in, we want to show that we are using authorized credentials we logged in the last example:


We can see that this admin user’s endpoint is an “Admin Only” endpoint in the application. For this test, we are passing an authorization token to authorize us. If you don’t input the authorization token, this load test will fail. However, if you pass a token through, the admin successfully authorizes the login.
Complete Load Test
Based on the various components above, we designed a load test for the website we are working on. It is still a work in progress, but it puts a lot of these parts together into one test.
Using load tests like this is a great way to validate your site’s data and confirm that it is running smoothly and efficiently.