Story is King: Storyboarding for Short Form Videos
In this age of smartphones and digital cameras, anyone can capture photos and videos. However, for most people, the content is then left in the device’s memory to gather dust. When they eventually look back at the images, they no longer remember the little details that made that event so special.
This is why I originally became interested in videos and short-form content. By taking the footage I capture and putting it into a video with a story arc, I’m not just benefiting the audience I share it with; I am also capturing the details of the moment. By putting the content into a video while it’s fresh in my mind, I have the opportunity to relive my experiences forever.
Why is Story Important
Story is King.
Stories let us share an experience in a way that creates an emotional connection with the audience. The goal of a story is to convey a message in a relatable way. At the end of the day, it doesn’t matter what equipment you’re using or what shots you get, as long as you’re able to tell the compelling story that you want to tell.
Story Blocks
When you think of a story, even a 30-second one, you want to follow a typical story arc:

Essentially, any story you create, no matter how short, should invoke a rollercoaster-like feeling in the viewer. The Hook and the Payoff, colored red above, are the most compelling moments of your story. The Hook should entice people to continue paying attention, while the Payoff resolves the tension that builds throughout the narrative. The Scene Setting should be calm, with the Build Up creating tension that leads to the eventual release at the Payoff. Finally, the Conclusion provides a calm moment so that the viewer can reflect on what they have watched.
All of these elements can be seen in the video I filmed of my five-day road trip along Highway 395 through the Sierra Mountains:
Hook
The Hook will vary based on the content and platform of your video. For example, if you are using YouTube, the thumbnail for your video is your initial Hook.
For my video, because I was focusing on traveling through the mountains, I wanted to use wide shots of the Sierras as my initial Hook:

Scene Setting
When setting the scene, it’s best to use wide-angle lenses, drones, or a Go Pro to capture wide shots of the scenery. In my video, I used these wide angles to showcase the mountain range, the weather, and all of the things the audience will experience as the story progresses.


Build up
The Build Up is where you begin to change the type of shots you’re using. Rather than using wide-angle shots, I now switched to mid-to-detail shots, action shots, and b-roll. This helps to dictate the specific actions of the story and close in on smaller details.


As you can see, I wanted to create the tension of the journey by using shots of climbing and hiking, and encourage the audience to picture the challenge of reaching the top of the cliff.
To capture these Build Up shots, I used mid-angle and long lenses (24-70mm), a GoPro, and my phone camera.
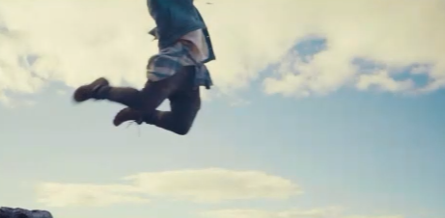
Payoff
The Payoff is the climax of your story and should release the tension that was created during the Build Up. To highlight the Payoff moment, I used mid-angle and long lenses (24-70mm), a GoPro, my phone camera, and 120+ FPS for slow-motion shots.


The Payoff moment of my video was when I jumped from the cliff and embraced freedom. I wanted to showcase the ecstasy of jumping, and then the joy and weightlessness I felt while making my way back down the mountain.
Conclusion
The Conclusion is your way of winding down the video and leaving your audience with a final thought. For my Conclusion, I returned to the mid and wide shots, action shots, setting shots, and landscape shots. I captured the Conclusion using a drone, mid-angle and long lenses (24-70mm), a GoPro, and my phone camera.


Though the shots in my Conclusion were similar to those seen at the beginning of the movie, I was fundamentally different. I used this parallelism to leave the audience with a feeling of introspection.
Workflow
When you begin creating your own videos, you can use whichever editing tool you are most comfortable with. I use Premier because that’s my preferred editing tool; however, all of the editing tools have shared workflow elements that work similarly.
Essentially, any editing tool you use will have:
- A section for your source material
- A way to view the video
- A timeline
The timeline is arguably the most important section of the editing tool, and also the most daunting. However, once you break it down, it is a simple and efficient feature.
The timeline contains multiple layers for both video and sound. In Premier, whatever you build upwards in your timeline is what will be overlayed on the video. It’s important to not only add music to embody the emotions you are trying to depict, but also additional sounds to help connect the entire story. For example, in the Payoff of the video, I added specific music that portrayed freedom, as well as bird calls to magnify the feelings of weightlessness.
Final Thoughts
Whether you are filming with expensive equipment or a cellphone, creating the story is the same. This narrative style and workflow can be applied to most forms of short-form video storytelling, from 3-second reels to 5+ minute travel videos. No matter how long your story is or what message you are trying to convey, it’s possible to create a visual timeline of shots that a viewer can immerse themselves in.