Git Merge Workflow on Github
How to Merge Code
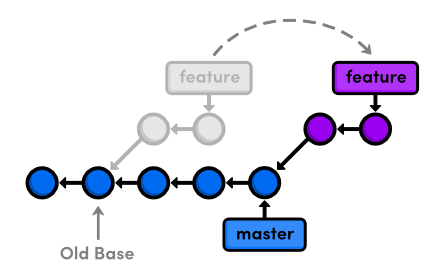
Below is a guide that I wrote for a recent project explaining a git merge workflow on Github. Often times, when you develop a new feature, you will create a new branch off of master called a feature branch. On the feature branch, you might have many commits to save your progress, or when you complete certain milestones of that feature. Once you finish the feature, you will want to merge this branch back to the master branch. However, you might not want all your commits to show up in the git log history because they were only for development purposes. We can overcome this issue by using a feature of git called interactive rebasing which allows you to squash certain commits and customize the commits that will eventually show up once the branch is merged to master. I have described the steps to achieve this outcome below.
Table of Contents
Purpose
This guide explains how to develop and commit your code using git and GitHub. A developer should create a feature branch when developing new code. In the feature branch, a developer may commit multiple times during development including making changes based on comments from a code review. When development is completed and the feature branch is ready to be merged in to the master branch, the developer should squash the commits in to one, so that the git log history is kept clean.