Developing Workflows in Group Side Projects
In 2019, when my friends and I found ourselves with extra free time, we decided to invest the time into making something that we could all enjoy. After sharing our interests and brainstorming ideas, ten of us decided to work together to create a video game. However, the time and effort needed to create a game far exceed the time and effort it takes to play it. In this blog post, I will use our video game creation to highlight the processes we utilized to stay organized and make our vision a reality.
That Clean “New Project” Smell
Finding the time for a side project can be difficult. Further complicating that by coordinating ten people on the same project can be daunting and getting everyone organized can feel impossible.
When you first start a project, everyone is in the honeymoon phase. The group is excited to use the newest tech and tools to immediately get the project off the ground, and the energy levels are high.
Side projects aren’t work; they’re not a full-time job. If a side project is unorganized, it can be easy for people to burn out or lose interest. To help everyone maintain a common goal and to keep the team on track, it is important to establish a vision and organizational structure early in the project.
The Vision
The vision is an established idea or goal that the team shares. It should be concrete, defined, and easily understood. However, it should also be large and relatively vague because it will then be broken into smaller goals. As you work through the project, the smaller goals may change and the methodology for how you reach them might evolve, but the overarching vision should stay the same.
For our project, we established the vision of creating a science fiction adventure video game called Second Star. In Second Star, players travel the galaxy to find a ship that was lost in space, solving puzzles and having adventures along the way. Once we had our broad video game idea, we then had to establish our organization.
Roles
When you have a multi-person project, I believe that it is essential to begin by assigning one decision-maker. This person should be responsible for most of the organization and coordination of the project and should be the one who is ultimately responsible for final decisions. Once your decision-maker is established, they can then begin helping the rest of the team find their roles.
Everyone on the project should have at least one job. Each team member should have a role that complements their skills. When multiple people share the same skillset, it’s sometimes necessary to consider experience vs. potential in role assignments.
It’s the responsibility of the decision-maker to ensure that everyone is involved and to begin delegating tasks. As roles are assigned, the team should make sure that the expectations for each role are clear.
Create the Organization
As you are creating the organization of your project, it is important to remember that the organization components are there to help you reach your goals; they are not the goals themselves. Therefore, you want your organization to be as simple and efficient as possible. Some of the most important organizational components are discussed below.
Requirements: One of the first things we had to do when we set up the organization of our project was to make a list of all of the requirements for the project. For example, to create a video game, we needed a game design document. Other side project requirements might take a different form, such as specs, blueprints, etc.
Task Management Software: For a side project, you want to make things as simple as possible, so task management software should be used for organization and nothing else. For Second Star, we tried several task management software options and still haven’t found one we really like. For now, we have settled on ClickUp.
Milestones: We established milestones. Something as large as a game needed to be broken down into goals, and then even smaller goals from there. We established two-month milestones and two-week sprints. This gave us bigger goals to look forward to and smaller goals that kept us on track.
A Place to Collaborate: It’s important to have a place where the group can collaborate and communicate. Popular collaboration spaces online include Discord, Slack, and Github. We collaborated by having meetings every two weeks. We ensured everyone was on the same page and no one had any questions.
A Place for Peripheral Ideas: When you have a lot of creative people working on a project, you’re going to have a lot of ideas, not all of which are in scope or related to what you are doing. However, even if they are ultimately not used, many of the ideas will be cool ideas that you want to acknowledge and celebrate. Whether it’s a Slack channel or a text chain, it’s important to have a space where people can spitball.
Delegate: For something on this scale, it’s just impossible for one person to do it all. It’s important to have trust in your teammates and to allow different people to control different parts of the project.
Create the Pipeline
Once you have your organization down, the fun stuff can begin. When you do something as multi-disciplined as a video game, you will have many different components that all must be created and then work cohesively. It’s important that you have pipelines that are consistent so that when you build a feature, you can just follow that pipeline every time. Remember: A good pipeline is a consistent pipeline.
Different features will have different pipelines. For example, the pipeline for creating a 3D asset will be different from the pipeline for creating a cutscene, which can require multiple stacking pipelines as it is a much more complex feature.
You can ensure your pipelines are successful by following a few rules of thumb:
- Draw on the expertise of your entire team to ensure your pipeline isn’t missing any steps and is running as efficiently as possible.
- Use the organizational tools to keep everyone informed and on task.
- Before starting a pipeline, make sure the whole team understands their role in the pipeline and there aren’t any outstanding questions.
Case Study: Holoprojector Pipeline
The Holoprojector is a tool that players will use on their spaceship to look for information, communicate, and choose where to travel. To create the holoprojector, we followed our 3D asset creation pipeline:
Step 1: Define the Asset. In this initial step, we define the game object, create a design document, and define what the asset is supposed to do. This is then given to the concept artist, who is going to take it and come up with their own interpretation that will be used to design the asset itself.
Step 2: Concept and Orthographic. The concept art is refined into an orthographic, which is used to show a 3D asset in 2D pictures. The orthographic helps the 3D artist build the asset in step 3.
Step 3: Modeling and Unwrapping. The asset is created in 3D and prepared to be put into the game engine.
Step 4: Textures, Holograph FX.
Step 5: Ready for Cutscene Production.
Whether we are building a large asset that is used throughout the game or a small asset that is barely observed in a single cutscene, we follow this same pipeline each time.
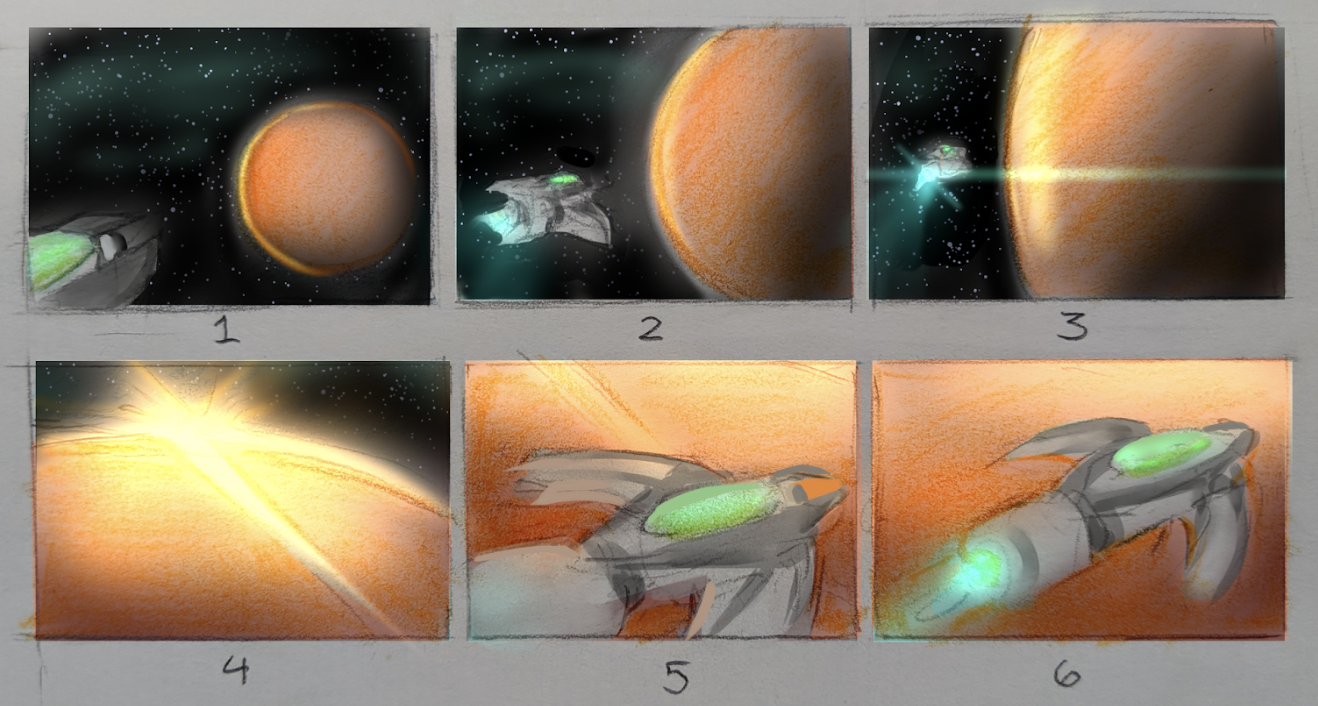
Case Study 2: Planet Approach Cutscene
When a player travels to a new planet for the first time, Second Star provides a short cutscene of the player arriving at the planet. There is music playing, voiceover of the crew talking, cool lens flares, and more all working together to make the cutscene captivating.
Because cutscenes are complex, there are multiple pipelines that make up the cutscene pipeline. For our planet cutscene, each individual pipeline is discussed as a step in the process below:
Step 1: Scene Script. We write the script in a Google doc. The script gets reviewed and edited and we make sure it’s not so long that the player could get bored.
Step 2: Storyboarding. Take the scene script and create a storyboard that outlines the visual flow of the cutscene. This part is fun because we get to see what the concept artist has in mind and get to experience the cutscene from the player’s perspective for the first time.
Step 3: Asset Production. This is the same as the pipeline discussed in the first case study. Each asset requires its own production, so this is typically the longest part of a cutscene’s production.
Step 4: Voiceovers and SFX. For Second Star’s casting, we had over 300 people audition. After choosing the actors, we recorded and edited each voice to get it into the game
Step 5: Music Composition. We had to compose the music for the cutscene. This required finding instruments that worked, laying down tracks, and making sure the music fit the mood of the scene.
Step 6: Scripting and Animating. This step takes all the components previously created and puts them onto timelines within the cutscene. These shots are rudimentary, as the final product has not been completed and polished.
Step 7: Final FX and Polish. In this step, we add the lighting and polish, and everything comes together.
As you can see, there is a lot of layering and months of work to create something that ultimately plays for about 30 seconds.
Things to Note
After working on this side project for a few years, I have learned a lot, and have several things to note for anyone thinking of starting their own group side project:
- As you learn better ways to do something, your pipeline will change. For example, the ship in our game took 4-5 months to make. However, it would take about 2 months today because we learned better ways to do it. We were using 3ds Max to create our models and now we use Blender. It’s okay if your pipeline changes, as long as the changes are clearly communicated to the team so there is no confusion.
- Don’t be afraid to say, “We’ll do that later.” This is the catchphrase I’ve adopted. It’s good to have new ideas and document them, even if they’re not in the original scope of the project. However, it’s also important to know that “later” may never actually happen.
- Sometimes ideas look better on paper than in implementation. When you’re writing your fancy design document, everything looks cool in your head. However, it may be that when it’s finally created, your user finds it boring. It’s okay to separate yourself from your idea. Your goal is to make a good game; if achieving this goal means you have to make adjustments or rewrite a portion of the game, that’s okay.
- Don’t be afraid to change your processes if something doesn’t work. “We have always done it that way” is a horrible attitude for a side project because it’s so easy to burn out. When you have a team working on a specific process, don’t try to brute force it. Instead, find a new process that makes your lives easier.
- Open communication. In every aspect of your project, it is important that the team has open, honest communication.
- As you scale, delegate more. On a project like Second Star, we all must understand we’re on the same team and have the same vision. It’s hard to step back, but it’s important.